git中文文档
https://git-scm.com/book/zh/v2
服务器安装配置
yum install -y git
添加git连接用户
1 |
|
添加 git repository
mkdir /data/git -p

## 创建一个空的Git仓库,服务器上的Git仓库通常都以.git结尾
git init --bare /data/git/hexo.git

## 设置目录权限
chown -R s_git:s_git /data/git
客户端设置
客户端密钥登陆设置
1. windows:

在用户的home个人目录下添加.ssh目录,比如用户Lion (C:\Users\lion\.ssh),添加密钥文件id_rsa, id_rsa.pub

需要安装git客户端,见文尾

2. linux:

在用户home目录下添加.ssh目录,如/home/lion/.ssh,添加密钥文件id_rsa, id_rsa.pub

## 可以在linux下生成密匙,并把公钥复制到git服务器s_git账户authorized_keys文件里。
ssh-keygen -t rsa -b 4096 -p "" -f "id_rsa"
git客户端初次使用
## 需要全局设置一下用户信息
git config --global user.name "John Doe"
git config --global user.email johndoe@example.com


## 查看git配置信息
git config --list
git配置文件地址
Git 自带一个 git config 的工具来帮助设置控制 Git 外观和行为的配置变量。 这些变量存储在三个不同的位置:

/etc/gitconfig 文件: 包含系统上每一个用户及他们仓库的通用配置。 如果使用带有 --system 选项的 git config 时,它会从此文件读写配置变量。

~/.gitconfig 或 ~/.config/git/config 文件:只针对当前用户。 可以传递 --global 选项让 Git 读写此文件。

当前使用仓库的 Git 目录中的 config 文件(就是 .git/config):针对该仓库。

每一个级别覆盖上一级别的配置,所以 .git/config 的配置变量会覆盖 /etc/gitconfig 中的配置变量。

在 Windows 系统中,Git 会查找 $HOME 目录下(一般情况下是 C:\Users\$USER)的 .gitconfig 文件。 Git 同样也会寻找 /etc/gitconfig 文件,但只限于 MSys 的根目录下,即安装 Git 时所选的目标位置
测试客户端推送
cd test
git init
git remote add origin ssh://s_git@wall.suroot.com:55555/data/git/hexo.git

touch test.txt
git add test.txt
git commit -m "init commit"

## 上传
git push origin master

## 下载
git pull origin master

## 删除
git -rm

## 查看所有分支
git branch -v
测试客户端克隆
mkdir test
cd test
git clone ssh://s_git@wall.suroot.com:55555/data/git/hexo.git
hexo网站自动发布
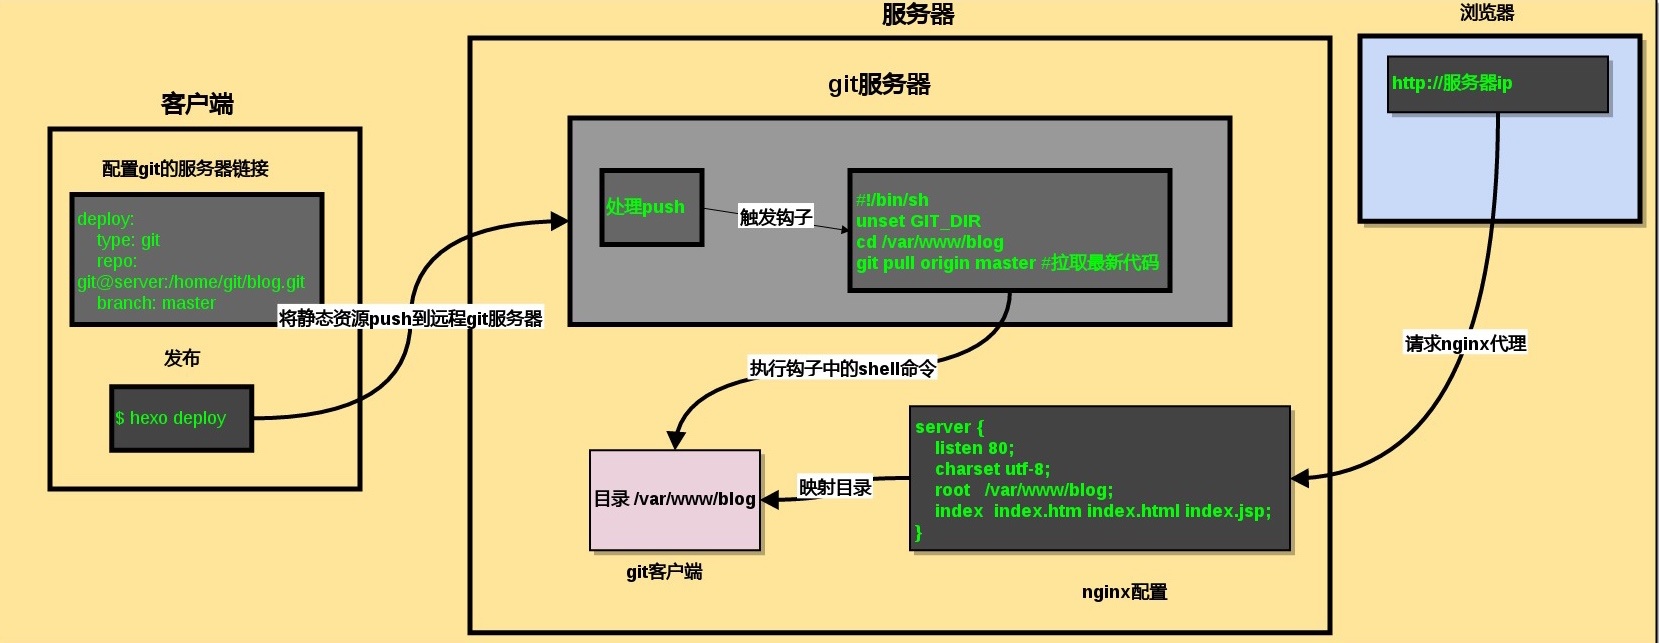
hexo 修改配置文件
## Deployment
## Docs: https://hexo.io/docs/deployment.html
## repo: git@github.com:xxx/xxx.github.io.git
deploy:
type: git
repo: ssh://s_git@wall.suroot.com:55555/data/git/hexo.git
branch: master
hexo 发布推送
## 生成hexo静态页面内容,并推送到git repository
hexo clean && hexo generate --deploy

## 指定额外配置文件,如果想推送到不同的git
hexo --config github.yml clean
hexo --config nginx_server.yml generate --deploy
nginx 服务配置
## nginx 服务器和git repository在同一服务器上

server {
    listen 80;
    charset utf-8;
    root   /data/www/blog;
    index  index.htm index.html index.jsp;
}

## 从git repository中克隆出hexo静态网站

mkdir /data/www/blog
git clone /data/git/hexo.git /data/www/blog

## 注意这里需要修改网站的文件夹为git用户,否则没权限更新
chown -R s_git:s_git /data/www/blog
git自动同步nginx网站
## git hooks 参考:
https://git-scm.com/book/zh/v2/%E8%87%AA%E5%AE%9A%E4%B9%89-Git-Git-%E9%92%A9%E5%AD%90

## 每当开发者将网站更新推送到git repository时,git就自动同步到网站目录
1 |
|
#判断是不是远端仓库bash脚本

#!/bin/sh
IS_BARE=$(git rev-parse --is-bare-repository)
if [ -z "$IS_BARE" ]; then
echo >&2 "fatal: post-receive: IS_NOT_BARE"
exit 1
fi
windows下git客户端安装
下载安装 git
https://git-scm.com/download/win

https://github.com/git-for-windows/git/releases/download/v2.17.1.windows.2/Git-2.17.1.2-64-bit.exe

https://github.com/git-for-windows/git/releases/download/v2.17.1.windows.2/PortableGit-2.17.1.2-64-bit.7z.exe


portable 版本,只需解压,在window环境变量里添加 解压路径\Git\cmd
1 | 安装版,只需命令行的,安装步骤如下: |
git 环境变量配置
安装成功后需要配置Git环境变量

「注意该步骤为Git在windows cmd命令中配置,如果不配置,直接使用Git Bash即可」

在Path变量中增加:C:\Program Files\Git\cmd

验证是否配置成功,打开windows命令行,输入git version命令,出现下列信息表示配置成功。


git config --global user.name dolphincn
git config --global user.email share2030cn@126.com

下面三行可以不操作

git config --global push.default matching
git config --global core.quotepath false
git config --global core.editor "vim"
添加ssh 密钥
添加github ssh 登陆密钥,

打开cmd,运行mkdir .ssh,

在当前用户的home目录下创建.ssh目录,把密钥复制进去.

密钥可以用ssh-key 或 GitHub上生成,私钥和公钥名字分别为:id_rsa id_rsa.pub

检验是否能连上了github,windows 命令行下运行,前提配置了git环境变量

$ ssh git@github.com
参考
Hexo+Git服务器搭建blog
http://yelog.org/2016/10/23/hexo-git-server-blog/